5. Appendix
5.1 Exploring a 3D-fractal
[ looking for somebody to translate this section... ]
The German version of this section describes how you could do with
"Fractint" what you can do with Quat now (>=0.92) in the "Object Editor"
if you use the user interface version.
5.2 Examples for the effect of some parameters
Here is described how a z-resolution that is too low can cause strange
images and how antialiasing can reduce the Moire-effect. All images are
low-quality-JPEGs.
 |
 |
 |
|
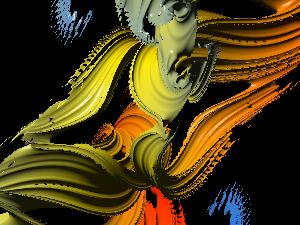
Image 1: This is an example for a depth resolution
that is too low (240): "resolution 320 240 240". You see the frayed edges
of the blue parts of the object. There the object is so thin that it is
not hit by a calculation with z-resolution of 240.
No antialiasing is done: "antialiasing 1" |
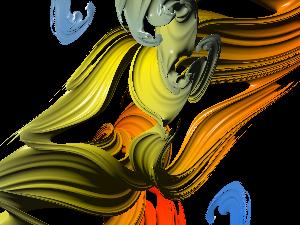
Image 2: This image has an increased z-resolution
(2048): "resolution 320 240 2048". The edges are no longer frayed out.
Nevertheless you can see disturbing patterns of pixels caused by the
so-called Moire-effect (on the orange parts of the image e.g.). They could
be reduced by antialiasing, which is not done in this example: "antialiasing
1" |
Image 3: Here is the image for reference.
It has a z-resolution that is high enough (2048): "resolution 320 240
2048" like the image on the left.
Additional it has an antialiasing value of 4: "antialiasing 4", which
means that every pixel is the average of 4x4 sub-pixels. |
|
5.3 Cross eyed view (for true 3D perception of an object)
Perhaps you know from the "Magic Eye" books that special ways to look at
something (without any additional equipment like 3d glasses) can produce
very amazing three dimensional perceptions. The principle used by Quat
is different from that of the "Magic Eye" books (Autostereograms), but
in my opinion it is easier to learn and achieves great results!
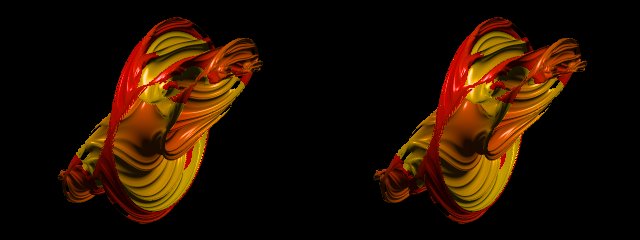
The principle is as follows: Two images seen from two slightly different
points are calculated and displayed next to each other. The image to the
right is for the left eye, the image to the left for the right eye. (Thus
the name "cross eyed"). If you hold your thumb in ca. 10 cm distance in
front of your eyes and look at it as usual, you'll remark that you see
the background twice. This is what the principle builds on.

Look at the example image above. Sit in front of the screen at the distance
you usually work at, and then hold your thumb between screen and your eyes
(nearer to the eyes than to the screen). You should sit straight in front
of the screen, not incline your head and not look from beside at the screen.
Now look at the thumb as usual. Pay attention to the images on the screen
(without looking at them directly, always look at the thumb!)
If you see four images now, then the thumb is too near to the eyes.
Move it a bit further away from the eyes and look at it again as usual,
while paying attention to the background. Change the distance thumb-eyes
until you only see three images. Now the one in the middle is seen three
dimensional, but perhaps not sharp. To get a sharp image is a matter of
concentration, with increasing experience it gets easier. Watch the non-sharp
image for a while (but don't look at it directly). There'll be a point
at which mind begins to recognize, that the data that it gets, make really
sense and it tries to make it sharp. For some people this process is a
bit difficult (as it was for me), others have no problem with it.
By the way, this way to view is not an exotic feature of Quat, in the
Internet such stereo images are widely used. This way it is possible to
display a photograph of a landscape three dimensionally, for example
5.4 The initialization file(s)
Initialization files are used to feed Quat with the parameters it needs
for image generation.
Users of a version with user interface (Windows, X Window System):
Though this paragraph also applies to these versions, most users probably
do not need to read it. You can use the dialogs to enter parameters conveniently
- but if you want, you can also use initialization files.
To start a calculation in the text only versions, a so-called "initialization
file" is needed, in which the object, the view, the colors and intersection
planes are defined. This file (and all that are "included", see below)
are simple text files, which can be written in any common text-editor,
(for example, "edit" with DOS, "notepad" with Windows, "vi" with Unix).
The syntax used is very simple, in every line there is a keyword with a
list of parameters following. (e.g., "viewpoint 0 0 1" defines the viewpoint)
In this initialization file you can include other files automatically
(by using the keyword "include"). This makes it possible to define color
ranges seperate from fractal data or intersection planes (in files with
a different suffix, e.g.). If such a file is included at a special location
in the initialization file, it is the same as if its contents would be
typed in at this location. The initialization file is only required to
start the calculation. Once a PNG file has been created, they aren't needed
any more. The fractal data is stored in the PNG file itself an can be reconstructed
from it.
Suggestion of how to separate the data in different files:
INI this file suffix type is given by Quat. Is is
the initialization file. All the information needed to generate an image
can be saved in it. It is also possible to "include" other files (as suggested
here).
OBJ Fractal parameters determining shape and viewpoint,
from which the object is shown and some raytracing parameters, which specify
the illumination, are defined in files with this suffix.
COL stores color or color-range of the object
CUT These files serve for the declaration of a intersection
plane configuration. (in most cases probably only a single intersection
plane).
This concept may appear a little bit complicated on the first view,
but it offers high flexibility. For example, it allows to give the fractal
other colors very quickly, or to add some intersection planes without changing
something on the object-definition itself: Only one line in the INI-file
has to be changed. But for those who still think this to be too complicated:
You can use all keywords in the initialization file, too.


